我們在網站上以 pytest 作為測試執行器。
如果你想在自己的電腦上下載並在本機執行 Python 軌道的練習測試,就需要在開發機器上安裝 pytest。
你也應該安裝下列 pytest 外掛:
我們也推薦使用程式碼檢查工具 pylint,它是網站上自動化回饋的一部分,也是很實用的靜態程式碼分析工具。
為了方便使用,pytest 的 pytest-pylint 外掛讓你能在命令列上透過 pytest 執行 pylint。
Pylint 的設定可能有點繁瑣,所以這份 pylint.readthedocs.io 的教學 對入門很有幫助,Real Python 的這篇 Code Quality: Tools and Best Practices 概觀也同樣有幫助。
安裝 pytest
你可以使用 Python 內建的公用程式 pip 來安裝與更新 pytest。
如果想看更多訣竅,Brett Cannon 寫了一份不錯的 如何為 Python 安裝套件的快速指南,也詳細說明了為什麼你該使用 python -m pip。
想進一步了解 Python 的命令列引數,請參閱 Python 文件中的命令列與環境。
注意:Python3 和 py 在你的系統上不一定會是 Python 的別名。
請據此調整下方的安裝指令。
若要在虛擬環境中安裝 pytest,請務必在執行指令前先啟用該環境。
否則 pytest 會安裝到全域環境。
Windows
PS C:\Users\foobar> py -m pip install pytest pytest-cache pytest-subtests pytest-pylint
Successfully installed pytest-8.3.3 ...
Linux / MacOS
$ python3 -m pip install pytest pytest-cache pytest-subtests pytest-pylint
Successfully installed pytest-8.3.3 ...
檢查安裝是否成功:
$ python3 -m pytest --version
pytest 8.3.3
執行測試
要執行測試,請在終端機中使用 cd 切換到存放練習的資料夾(請把下方的 <exercise-folder-location> 換成你的路徑)。
$ cd <exercise-folder-location>
<exercise-folder-location> 或大多數在尖括號裡的內容,代表一個**預留位置值**。
一般路徑或檔案名稱應該寫成_不含_任何括號的樣子。
例如:/Users/janedoe/exercism/python/exercises/concept/chaitanas-colossal-coaster(在 *nix 系統上)、C:\Users\janedoe\exercism\python\exercises\practice\hello-world\(在 Windows 上)、myFolder 或 my_file.py。
你想執行的檔案通常以 _test.py 結尾。
這個檔案包含練習解答的測試,和你在網站上傳解答時所執行的測試相同。
接著,在終端機中執行以下指令,並把 <exercise_test.py> 換成測試檔案的位置/名稱:
$ python3 -m pytest -o markers=task <exercise_test.py>
==================== 7 passed in 0.08s ====================
修正警告
如果沒有在上方的指令中使用 pytest -o markers=task,當你執行使用我們_新_語法的測試時,可能會出現關於「unknown markers」的 warnings。
為了避免每次執行測試都要輸入 pytest -o markers=task,你可以使用 pytest.ini 設定檔,這個檔案可以從 Python 軌道目錄的最上層下載:pytest.ini。
你也可以自己建立 pytest.ini 檔案,內容如下:
[pytest]
markers =
    task: A concept exercise task.
把這個檔案放在 Exercism 練習的_根_目錄或_工作_目錄中,就會註冊這些標記並停止警告。
更多關於 pytest 標記的資訊,可以在 pytest 文件中關於標記測試函式以及使用自訂標記的說明找到。
更多關於自訂 pytest 設定的資訊,可以在 pytest 文件中關於設定檔格式的說明找到
測試失敗
當測試失敗時,pytest 會在終端機印出每個失敗測試的內容,以及每個測試預期與實際的 return 值。
以下是失敗測試的一般範例:
$(my_venv) python3 -m pytest -o markers=task <exercise_test.py>

=================== FAILURES ====================
______________ name_of_failed_test ______________
# Test code inside of <exercise_test.py> that failed.
...
E   TypeOfError: ReturnedValue != ExpectedValue

exercise_test.py:<line_of_failed_test>: TypeOfError
============ short test summary info ============
FAILED exercise_test.py::ExerciseTest::name_of_failed_test
========== 1 failed, 2 passed in 0.13s ==========
額外引數
如果你真的很講究 pytest 在你的畫面上顯示什麼,這裡有一些方便的命令列引數,可以讓你設定它的行為。
顯示所有詳細資訊 [-v]
加上 -v(verbose)旗標後,除了測試失敗之外,還會顯示環境資訊與測試摘要:
$(my_venv)  python3 -m pytest -o markers=task -v exercises/<exercise_name>/<test_file_test.py>

======================================== test session starts ===========================================
platform darwin -- Python 3.9.0, pytest-6.2.5, -- /usr/local/envs/my_env/bin/python3
cachedir: .pytest_cache
metadata: {'Python': '3.9.0', 'Platform': 'macOS-10.14.6-x86_64-i386-64bit', 'Packages': {'pytest': '6.2.1'}, 'Plugins': {'subtests': '0.5.0', 'pylint': '0.18.0'}
rootdir: /Users/<user>/exercism/python, configfile: pytest.ini
plugins: subtests-0.5.0, pylint-0.18.0

collected 5 items

exercises/exercise-name/exercise_file_test.py::ExerciseNameTest::test_one FAILED                          [ 20%]
exercises/exercise-name/exercise_file_test.py::ExerciseNameTest::test_two FAILED
exercises/exercise-name/exercise_file_test.py::ExerciseNameTest::test_three PASSED                        [ 40%]
exercises/concept/exercise-name/exercise_file_test.py::ExerciseNameTest::test_four FAILED
exercises/concept/exercise-name/exercise_file_test.py::ExerciseNameTest::test_five PASSED                 [ 60%]
exercises/concept/exercise-name/exercise_file_test.py::ExerciseNameTest::test_six FAILED
exercises/concept/exercise-name/exercise_file_test.py::ExerciseNameTest::test_seven PASSED                [ 80%]
exercises/concept/exercise-name/exercise_file_test.py::ExerciseNameTest::test_eight FAILED
exercises/concept/exercise-name/exercise_file_test.py::ExerciseNameTest::test_nine PASSED                 [100%]

================================================ FAILURES ======================================================
# Failed tests are then individually printed out below

.......
第一次失敗後就停止 [-x]
使用 -x 旗標會照常執行測試,但會在第一次測試失敗時停止。
當你想一次除錯單一任務或單一測試失敗時,這很有幫助:
$(my_venv) python3 -m pytest -o markers=task -x exercises/<exercise_name>/<test_file_test.py>

=================== FAILURES ====================
_______________ example_test_foo ________________
...
...
============ short test summary info ============
FAILED example_test.py::ExampleTest::example_test_foo
!!!!!!!!!!! stopping after 1 failures !!!!!!!!!!!
========== 1 failed, 5 passed in 0.28s ==========
優先執行失敗的測試 [--ff]
pytest-cache 外掛會記住你上次執行 pytest 時哪些測試失敗,所以使用 --ff 旗標會讓 pytest 先執行之前失敗的測試,再繼續執行其餘測試。
如果你針對某個特定任務或一組輸入做了許多小幅修正,這可能會加快測試速度。
$(my_venv) python3 -m pytest -o markers=task --ff <example_file_test.py>
==================== 7 passed in 503s ====================
建議的工作流
我們建議使用以下指令,讓你的除錯更輕鬆(或許)也更快:
首先,把工作目錄切換到你想要測試的練習目錄:
$(my_venv) cd path/to/exercise
然後,搭配前面說明過的引數 -x 和--ff 執行測試:
$(my_venv) python3 -m pytest -o markers=task -x --ff <example_file_test.py>
這會測試你的解答。
當 pytest 遇到失敗的測試,程式會停止並告訴你是哪個測試失敗。
當你修正後再次執行測試,pytest 會先執行上次失敗的測試,再繼續執行其餘測試。
搭配 pytest 使用 PDB(Python 除錯器)
如果你想「像專家一樣除錯」,可以在 pytest 指令後面加上 --pdb 引數,進入內建的 Python 除錯器 PDB。
$(my_venv) python3 -m pytest -o markers=task -x --ff --pdb <example_file_test.py>
=============== 4 passed in 0.15s ===============
當測試失敗時,進入 PDB 可以讓你逐步執行程式碼、檢視目前的作用域,也能查看變數的值和不同函式的簽章。
更多關於 PDB 模組的細節可以在 Python 的 PDB 文件 中找到。
此外,pytest 的 PDB 文件 和 Real Python 的這份指南 也非常有幫助。
擴充你的 IDE
如果你想用一些能協助你測試與改進程式碼的工具來擴充你的 IDE,請看看 工具 頁面。
我們在那裡介紹了多種 IDE、編輯器,以及一些用於程式碼檢查與除錯的實用擴充功能。
其他資訊
把 python 加入你的 PATH
注意: 如果你是在 Windows 上透過 PSF Installer 安裝 Python,那麼指令會是 py 而不是 python3。
每次想執行模組都要輸入 python3 -m 有點煩人。
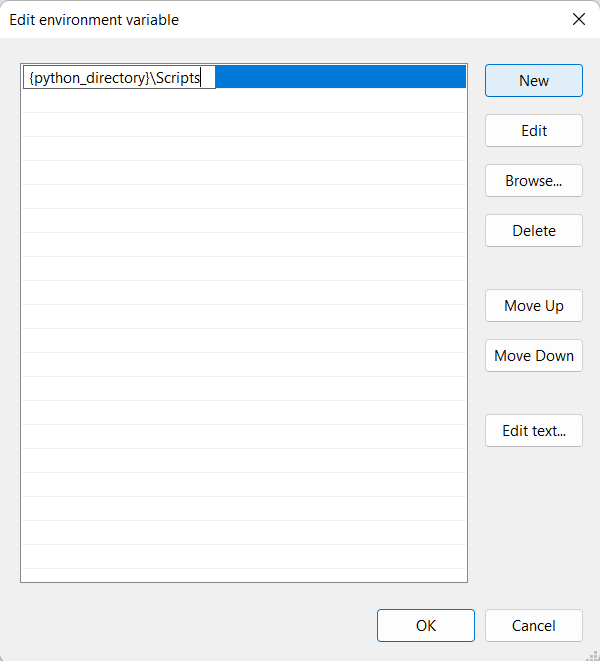
為了避免這樣,你可以把 Python 安裝目錄中的 Scripts 資料夾加入你的 path。
如果你不知道 Python 安裝在哪裡,請在終端機中執行下列指令:
$ python3 -c "import os, sys; print(os.path.dirname(sys.executable))"
<python_directory>
_回傳_的目錄就是你目前使用中的 Python 版本安裝的位置,在本節中會以 <python_directory> 表示。
Windows
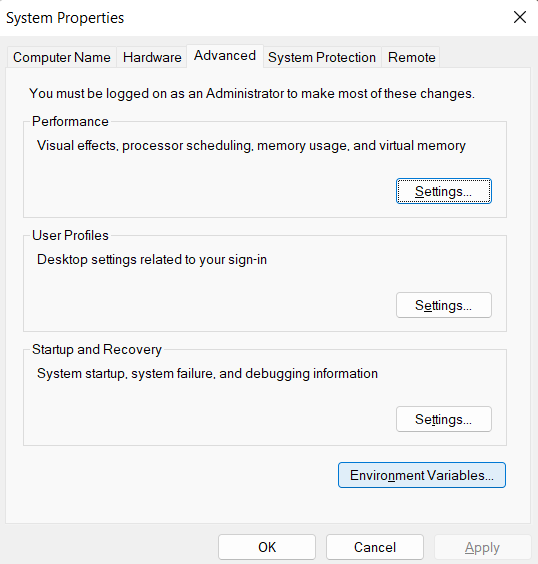
點擊 Windows Start 按鈕,搜尋 Edit the system environment variables,然後按 Enter。
接著按下 Environment Variables...:
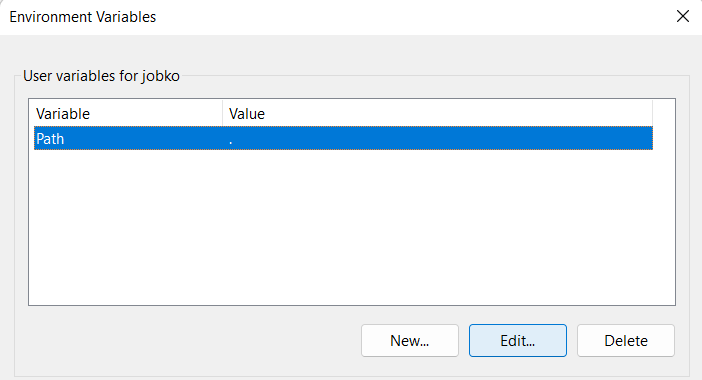
然後在_使用者變數_中找到 Path 變數,選取它,並點擊 Edit...:
然後新增一行,如圖所示,並把 <python_directory> 換成你 Python 安裝的目錄:
MacOS/Linux
以下做法應該適用於大多數使用 bash shell 的 Linux 與 MacOS 版本。
指令可能會因 Linux 發行版,以及使用的是 fish 還是 zsh shell 而有所不同。
把 <python_directory> 換成 python3 -c "import os, sys; print(os.path.dirname(sys.executable))" 的輸出。
export PATH="$PATH:<python_directory>"