हम अपनी वेबसाइट के टेस्ट रनर के रूप में pytest इस्तेमाल करते हैं।
अगर आप Python ट्रैक के अभ्यासों के टेस्ट अपने सिस्टम पर डाउनलोड करके चलाना चाहते हैं, तो आपको अपनी डेवलपमेंट मशीन पर pytest इंस्टॉल करना होगा।
आपको ये pytest प्लगइन भी इंस्टॉल करने चाहिए:
हम pylint नाम का कोड लिंटिंग प्रोग्राम इस्तेमाल करने की भी सलाह देते हैं, क्योंकि यह वेबसाइट पर मिलने वाले हमारे ऑटोमेटेड फीडबैक का हिस्सा है और स्टैटिक कोड विश्लेषण का बहुत काम का टूल साबित हो सकता है।
आसानी के लिए, pytest का pytest-pylint प्लगइन आपको कमांड लाइन पर pytest के ज़रिए pylint चलाने देता है।
Pylint का कॉन्फ़िगरेशन थोड़ा भारी लग सकता है, इसलिए शुरुआत करने में tutorial from pylint.readthedocs.io मददगार हो सकता है। इसी तरह Real Python की Code Quality: Tools and Best Practices भी काम आ सकती है।
pytest इंस्टॉल करना
Pytest को Python की बिल्ट-इन यूटिलिटी pip की मदद से इंस्टॉल और अपडेट किया जा सकता है।
कुछ और सुझावों के लिए Brett Cannon की quick-and-dirty guide on how to install packages for python अच्छी है, और साथ में why you should use python -m pip की भी बढ़िया व्याख्या है।
Python के कमांड लाइन आर्गुमेंट के बारे में और जानने के लिए Python के डॉक्यूमेंटेशन में command line and environment देखिए।
ध्यान दें: आपके सिस्टम पर Python3 और py, Python के एलियस हों भी सकते हैं और नहीं भी।
कृपया नीचे दिए इंस्टॉल कमांड उसी के मुताबिक बदल लीजिए।
किसी वर्चुअल एनवायरनमेंट में pytest इंस्टॉल करना है, तो कमांड चलाने से पहले यह पक्का कर लीजिए कि वह एनवायरनमेंट चालू है।
वरना pytest पूरे सिस्टम के लिए इंस्टॉल हो जाएगा।
Windows
PS C:\Users\foobar> py -m pip install pytest pytest-cache pytest-subtests pytest-pylint
Successfully installed pytest-8.3.3 ...
Linux / MacOS
$ python3 -m pip install pytest pytest-cache pytest-subtests pytest-pylint
Successfully installed pytest-8.3.3 ...
यह जाँचने के लिए कि इंस्टॉलेशन सफल हुआ या नहीं:
$ python3 -m pytest --version
pytest 8.3.3
टेस्ट चलाना
टेस्ट चलाने के लिए, अपने टर्मिनल में cd का इस्तेमाल करके उस फोल्डर में जाइए जहाँ अभ्यास रखा है (नीचे दिए <exercise-folder-location> की जगह अपना पाथ लिखिए)।
$ cd <exercise-folder-location>
<exercise-folder-location> या एंगल ब्रैकेट के अंदर लिखी लगभग हर चीज़ एक प्लेसहोल्डर वैल्यू दिखाती है।
सामान्य पाथ या फाइल का नाम बिना किसी ब्रैकेट के लिखा जाना चाहिए।
जैसे: /Users/janedoe/exercism/python/exercises/concept/chaitanas-colossal-coaster (*nix सिस्टम पर), C:\Users\janedoe\exercism\python\exercises\practice\hello-world\ (Windows पर), myFolder या my_file.py।
जिस फाइल को आप चलाना चाहेंगे, उसका नाम आम तौर पर _test.py पर खत्म होता है।
इस फाइल में अभ्यास के हल के टेस्ट होते हैं, और ये वही टेस्ट हैं जो वेबसाइट पर हल अपलोड करने पर चलते हैं।
अब अपने टर्मिनल में यह कमांड चलाइए, और <exercise_test.py> की जगह टेस्ट फाइल का पाथ या नाम लिखिए:
$ python3 -m pytest -o markers=task <exercise_test.py>
==================== 7 passed in 0.08s ====================
चेतावनियाँ ठीक करना
अगर आप ऊपर दिए कमांड में pytest -o markers=task इस्तेमाल नहीं करते, तो जब आप हमारी नई सिंटैक्स वाला कोई टेस्ट चलाएँगे, तब आपको "unknown markers" के बारे में warnings मिल सकती हैं।
हर बार टेस्ट चलाते समय pytest -o markers=task टाइप करने से बचने के लिए आप pytest.ini नाम की कॉन्फ़िगरेशन फाइल इस्तेमाल कर सकते हैं। यह फाइल Python ट्रैक डायरेक्टरी के सबसे ऊपरी स्तर से डाउनलोड की जा सकती है: pytest.ini।
आप अपनी खुद की pytest.ini फाइल भी बना सकते हैं, जिसमें यह सामग्री हो:
[pytest]
markers =
    task: A concept exercise task.
इस फाइल को Exercism के अभ्यासों की रूट या वर्किंग डायरेक्टरी में रखने से मार्क्स रजिस्टर हो जाते हैं और चेतावनियाँ बंद हो जाती हैं।
pytest मार्क्स के बारे में अधिक जानकारी pytest के डॉक्यूमेंटेशन में marking test functions और working with custom markers वाले हिस्सों में मिल सकती है।
pytest की कॉन्फ़िगरेशन बदलने के बारे में अधिक जानकारी pytest के डॉक्यूमेंटेशन में configuration file formats वाले हिस्से में मिल सकती है।
टेस्ट फेल होना
जब टेस्ट फेल होते हैं, तो pytest टर्मिनल पर हर फेल हुए टेस्ट का टेक्स्ट छापता है, और साथ में हर टेस्ट की अपेक्षित तथा वास्तविक return वैल्यू भी।
नीचे एक फेल हुए टेस्ट का सामान्य उदाहरण दिया है:
$(my_venv) python3 -m pytest -o markers=task <exercise_test.py>

=================== FAILURES ====================
______________ name_of_failed_test ______________
# Test code inside of <exercise_test.py> that failed.
...
E   TypeOfError: ReturnedValue != ExpectedValue

exercise_test.py:<line_of_failed_test>: TypeOfError
============ short test summary info ============
FAILED exercise_test.py::ExerciseTest::name_of_failed_test
========== 1 failed, 2 passed in 0.13s ==========
अतिरिक्त आर्गुमेंट
अगर आप ठीक-ठीक तय करना चाहते हैं कि pytest आपकी स्क्रीन पर क्या दिखाए, तो यहाँ कुछ काम के कमांड लाइन आर्गुमेंट दिए हैं, जिनसे आप उसका व्यवहार सेट कर सकते हैं।
सारी जानकारी दिखाना [-v]
-v (verbose) फ्लैग जोड़ने पर टेस्ट फेलियर के अलावा एनवायरनमेंट की जानकारी और टेस्ट का सारांश भी दिखता है:
$(my_venv)  python3 -m pytest -o markers=task -v exercises/<exercise_name>/<test_file_test.py>

======================================== test session starts ===========================================
platform darwin -- Python 3.9.0, pytest-6.2.5, -- /usr/local/envs/my_env/bin/python3
cachedir: .pytest_cache
metadata: {'Python': '3.9.0', 'Platform': 'macOS-10.14.6-x86_64-i386-64bit', 'Packages': {'pytest': '6.2.1'}, 'Plugins': {'subtests': '0.5.0', 'pylint': '0.18.0'}
rootdir: /Users/<user>/exercism/python, configfile: pytest.ini
plugins: subtests-0.5.0, pylint-0.18.0

collected 5 items

exercises/exercise-name/exercise_file_test.py::ExerciseNameTest::test_one FAILED                          [ 20%]
exercises/exercise-name/exercise_file_test.py::ExerciseNameTest::test_two FAILED
exercises/exercise-name/exercise_file_test.py::ExerciseNameTest::test_three PASSED                        [ 40%]
exercises/concept/exercise-name/exercise_file_test.py::ExerciseNameTest::test_four FAILED
exercises/concept/exercise-name/exercise_file_test.py::ExerciseNameTest::test_five PASSED                 [ 60%]
exercises/concept/exercise-name/exercise_file_test.py::ExerciseNameTest::test_six FAILED
exercises/concept/exercise-name/exercise_file_test.py::ExerciseNameTest::test_seven PASSED                [ 80%]
exercises/concept/exercise-name/exercise_file_test.py::ExerciseNameTest::test_eight FAILED
exercises/concept/exercise-name/exercise_file_test.py::ExerciseNameTest::test_nine PASSED                 [100%]

================================================ FAILURES ======================================================
# Failed tests are then individually printed out below

.......
पहली फेलियर पर रुक जाना [-x]
-x फ्लैग लगाने पर टेस्ट सामान्य तरीके से चलते हैं, लेकिन पहली टेस्ट फेलियर आते ही टेस्ट रन रुक जाता है।
यह तब काम आता है जब आप एक बार में एक ही टास्क या टेस्ट फेलियर डीबग करना चाहते हैं:
$(my_venv) python3 -m pytest -o markers=task -x exercises/<exercise_name>/<test_file_test.py>

=================== FAILURES ====================
_______________ example_test_foo ________________
...
...
============ short test summary info ============
FAILED example_test.py::ExampleTest::example_test_foo
!!!!!!!!!!! stopping after 1 failures !!!!!!!!!!!
========== 1 failed, 5 passed in 0.28s ==========
फेल हुए टेस्ट पहले [--ff]
pytest-cache प्लगइन याद रखता है कि पिछली बार pytest चलाने पर कौन-से टेस्ट फेल हुए थे। इसलिए --ff फ्लैग लगाने पर pytest पहले वे टेस्ट सबसे पहले चलाता है जो पिछली बार फेल हुए थे, और उसके बाद बाकी टेस्ट चलाता है।
अगर आप किसी एक टास्क या इनपुट के समूह के आसपास बहुत सारे छोटे-छोटे सुधार कर रहे हैं, तो इससे आपकी टेस्टिंग तेज़ हो सकती है।
$(my_venv) python3 -m pytest -o markers=task --ff <example_file_test.py>
==================== 7 passed in 503s ====================
सुझाया गया वर्कफ्लो
डीबगिंग को आसान और (शायद) तेज़ बनाने के लिए हम ये कमांड इस्तेमाल करने की सलाह देते हैं:
सबसे पहले अपनी वर्किंग डायरेक्टरी उस अभ्यास की डायरेक्टरी में बदलिए जिसे आप टेस्ट करना चाहते हैं:
$(my_venv) cd path/to/exercise
फिर पहले बताए गए आर्गुमेंट -x और --ff के साथ टेस्ट चलाइए:
$(my_venv) python3 -m pytest -o markers=task -x --ff <example_file_test.py>
इससे आपके हल का टेस्ट हो जाएगा।
जब pytest को कोई फेल हुआ टेस्ट मिलता है, तो प्रोग्राम रुक जाता है और बताता है कि कौन-सा टेस्ट फेल हुआ।
जब आप सुधार करके टेस्ट दोबारा चलाते हैं, तो pytest पहले वही पिछला फेल हुआ टेस्ट चलाता है, और उसके बाद बाकी टेस्ट चलाता है।
pytest के साथ PDB, यानी Python डीबगर, का इस्तेमाल
अगर आप "प्रो की तरह डीबग" करना चाहते हैं, तो pytest कमांड के बाद --pdb आर्गुमेंट लगाइए और Python के बिल्ट-इन Python debugger, यानी PDB, में उतर जाइए।
$(my_venv) python3 -m pytest -o markers=task -x --ff --pdb <example_file_test.py>
=============== 4 passed in 0.15s ===============
जब कोई टेस्ट फेल होता है, तो PDB में उतरने पर आप अपने कोड को स्टेप-बाय-स्टेप चला सकते हैं, मौजूदा स्कोप देख सकते हैं, और वेरिएबलो की वैल्यू तथा अलग-अलग फंक्शन के सिग्नेचर भी जाँच सकते हैं।
PDB मॉड्यूल के बारे में अधिक जानकारी Python documentation on PDB में मिल सकती है।
इसके अलावा pytest docs on PDB और Real Python की यह गाइड भी बेहद मददगार हैं।
अपने IDE को बढ़ाना
अगर आप अपने IDE में ऐसे टूल जोड़ना चाहते हैं जो आपके कोड को टेस्ट करने और बेहतर बनाने में मदद करें, तो tools पेज देखिए।
वहाँ हम कई IDE, एडिटर और लिंटिंग तथा डीबगिंग के लिए काम के कुछ एक्सटेंशन देखते हैं।
अतिरिक्त जानकारी
Python को अपने PATH में जोड़ना
ध्यान दें: अगर आपने Windows पर Python को PSF Installer के ज़रिए इंस्टॉल किया है, तो कमांड python3 की जगह py होगी।
जब भी कोई मॉड्यूल चलाना हो, हर बार python3 -m टाइप करना थोड़ा झुंझलाहट भरा लग सकता है।
इससे बचने के लिए आप अपनी Python इंस्टॉलेशन के Scripts फोल्डर को अपने पाथ में जोड़ सकते हैं।
अगर आपको पता नहीं कि Python कहाँ इंस्टॉल है, तो अपने टर्मिनल में यह कमांड चलाइए:
$ python3 -c "import os, sys; print(os.path.dirname(sys.executable))"
<python_directory>
जो डायरेक्टरी लौटाई जाती है, वहीं आपका मौजूदा चालू Python वर्ज़न इंस्टॉल है। इस हिस्से में उसे <python_directory> कहा गया है।
Windows
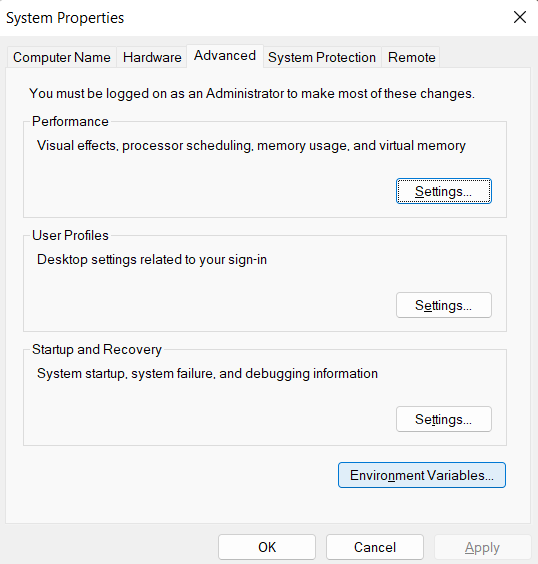
Windows Start बटन पर क्लिक कीजिए और Edit the system environment variables खोजिए, फिर एंटर दबाइए।
इसके बाद Environment Variables... दबाइए:
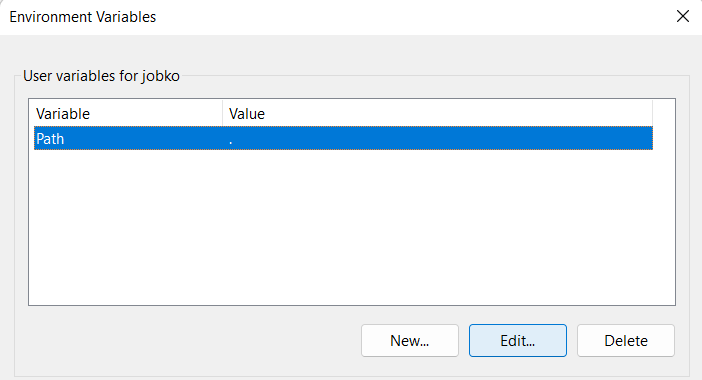
फिर अपने User variables में Path वेरिएबल ढूँढिए, उसे चुनिए और Edit... पर क्लिक कीजिए:
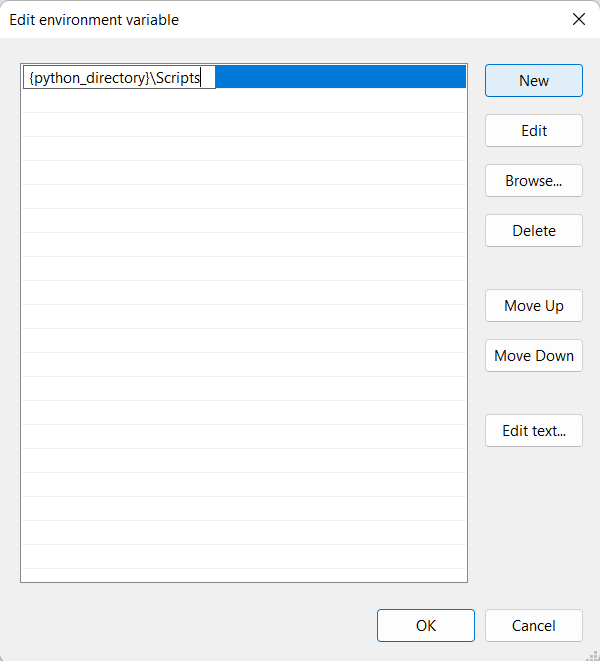
फिर तस्वीर में दिखाए अनुसार एक नई लाइन जोड़िए, और <python_directory> की जगह अपनी Python इंस्टॉलेशन की डायरेक्टरी लिखिए:
MacOS/Linux
नीचे दिया तरीका bash शेल वाले ज़्यादातर Linux और MacOS पर काम करेगा।
कमांड Linux डिस्ट्रो के हिसाब से बदल सकते हैं, और इस पर भी निर्भर करते हैं कि fish या zsh शेल इस्तेमाल हो रहा है या नहीं।
<python_directory> की जगह python3 -c "import os, sys; print(os.path.dirname(sys.executable))" का आउटपुट लिखिए।
export PATH="$PATH:<python_directory>"